Tuesday 24 December 2013

Sweet Poppy Stencil


Sweet Poppy Stencil


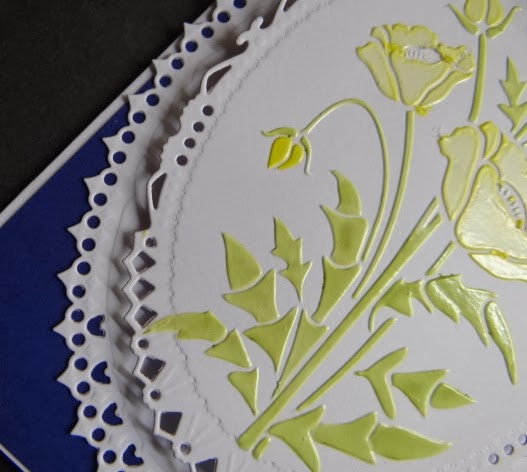
Good Morning All. My last card to blog before Christmas is another stencil by Sweet Poppy Stencils.
I thought I would make it light and fresh ( Spring around the corner!!) and used a yellow jelly roll pen for the flowers and Distress pen for the leaves. White glossy paste  and patience to let it dry before matt and layering onto 2 Spellbinders cut diesin white card. Thought the navy background made it pop from the card.


Monday 23 December 2013

Sea Horses and Water Droplets from Designs by Ryn


Made a crazy world for the Seahorses. Used a stencil and Kelp stamp for the background. Stamped Water Droplets in black Versafine and highlighted each drop with a white pen to make them pop.Stamped the Seahorses with Black Versafine and coloured using a metallic Promarker pen. Distressed edged and matt and layered onto a deep jade card.
 
More #stamps at :-       designsbyryn.com


Sweet Poppy Stencils today


My Stencil today is the Poppy from  Sweet Poppy Stencil. Used a blue micron pen to draw in the outline of the stencil and then used a denim Distress Pen to fill in. Translucent paste and then microbeads  after the stencil had been removed. Ran through a n embossing folder for a change. Layered onto a card and distressed the edges and drew a double blue lie arund.
Matted onto navy card and a lightly pearlised pale grey base of  card from
 
papermilldirect.com ( on offer at the moment!)
rangerink.com
 Stencil from www.sweet-poppy.co.uk

Sentiment to finish


Saturday 21 December 2013

Heartfelt Creations Stamp


One of my recently acquired stamps from Heartfelt Creation is the basis of my card today 
 
Stamped image and coloured flowers with various Jelly Roll Pens. Used Vintage Photo Distress ink to go lightly over the door. Used a Spellbinders 5 x 7 card creator Die to cut out frame and inked and added copper Stickles. Matt and layered with black card just inside Die cut image and a subtle glitter card under before mounting onto a card base.

Friday 20 December 2013

Sweet Poppy Stencils

 
My 2 cards today uses a  Sweet Poppy Stencil coloured through with Pen Touch and Distress Pens. Left to dry and then stencilled with translucent paste. Carefully removed stencil and then covered , whilst wet with clear micro beads. Left them without having a " I'll see if it's dry" dab , overnight to fully dry.
** The card on the left has been distressed lightly with Vintage Photo DI, edged with a memento green and then matt and layered with some ribbon.
** the second card has a bit more technique.  I cut a second piece of card with a  1"  border all round. Put a small bit of double sided tape to hold the top layer to the bottom and then stamp with a Lavinia Stamp to cross both pieces of card. Took top piece off bottom and distressed around the edges.  Used a score board to make a  detail line  around each piece .Matt and layered each piece onto black card. The stencilled piece is mounted using foam pads to lift. Ribbon knot to finish.


Friday 13 December 2013

Sweet Poppy Stencil and Pan Pastels


My card today is on linen effect card and uses PanPastels and a Sweet Poppy Stencil
 
I actually worked a bit back to front with this card! Stencilled through with Pans and then used a Iridescent paste thought the stencil. Left to dry to see what colour came through the paste. It was a very subtle colouring on drying  so I thought I would build the background around the shading I achieved and left the centre lightness around the houses and worked out to be darker. Buffed up stencilling with a soft cloth.
Put highlights of Liquid pearls to finish
 
***********


Thursday 12 December 2013

Christmas Lanterns


A different project today - making Chinese Lanterns
 
Found this card in my stash from last year and the ribbon was in my late Mum's craft box
Inside each lantern I have put an LED light.


http://rheddandrosies.blogspot.co.uk/2013/12/use-old-stash-21st-challenge.html


Saturday 7 December 2013

Allhallows Workshop

 
My samples from the Workshop with Eileen today
 
 Tag with Distress Inks and bleaching

Tag with Distress Inks and Stamping

 Card Distress Inks, Stamping, Water and white pens

 Card - layering up stamping, water work, flicking paint and  background stamping!

 Card using PanPastels Stamping, Decoupage, Hougie board and gilding
 
Had a great day at the workshop today and loved all the samples we made. Think my favourite is the PanPastel card ( at the moment!)
 
Thank you Eileen


Wednesday 4 December 2013

Christmas Wreath Card with Ribbon weaving

Stamped and heat embossed the holly and flourishes for the background. Added red Stickles for the berries Cut the Spellbinders poinsettia from red Mirri card and the leaves from gold. Assembled the flower with silicone. Made the wreath by ribbon weaving red organza ribbon with a beige satin ribbon. Joined into a circle at the bottom so the join would be hidden by the flower.
A bit of matt and layering to finish.


I am entering this card into the following Challenge:


http://ladybugcrafts.blogspot.co.uk/

Lavinia Stamps


Lavinia Stamps and Pan Pastels


Used Pans for the background. Took out the colour from around the trees. Stamped  houses on the cards and off for decoupaging.
 
 Used Distress Pens and assorted Sakura Pens for colouring.
Added some stickles for the berries on the trees and "flowers". White opal Liquid Pearls added the light streaks going up into the sky.
 
***************


Tuesday 3 December 2013

Clean and Simple Card ( CAS Card)


My CAS Card


A simple card based on 3 circles , white and green foliage ( Spellbinders Die ) with a purple butterfly as the focal point. I used a linen effect card base. That's it!
Based, with slight variation on a card my friend Eileen has shown before


I am entering this card into the following challenge:-


http://craftycardmakers.blogspot.co.uk/2013/11/105-clean-and-simple.html

Pan Pastels with a medium


PanPastels with Maimeri Iridescent paste
 

I used Pans to create the background , shading from light to heavy purple using Pans. I then covered with the Maimeri Iridescent Paste - tried to get an even covering first go so as not to disturb the Pans. I then used a piece of bubble wrap to push into the paste to give texture to the background. Left to dry overnight, then cut into 3 panels. I embossed a frame around each panel. Mounted onto silver  Centura Pearl card and then pick out the leaf colour for the  card base. Added flowers and leaves made from a Heartfelt Creations Die and a butterfly from a die in my collection. Added Liquid pearls to add further detail onto the flowers


I am entering this card into the following challenge:-


http://panpasteluk.blogspot.co.uk/2013/11/wk47-pan-pastel-uk-challengemix-it-up.html


Sunday 1 December 2013

Christmas Card

Christmas Card


Into finishing my Christmas Cards soon, so I thought I would share this card I have made. Backing paper from my stash, Spellbinders Poinsettia Die Set and an Ivy flourish from Tattered Lace and Yellow Ranger Stickles is all you need for this card. I used some textured card I found in my stash for the poinsettia and added the Stickles for the stamens. Gold card for the ivy flourish and that's it!
***********************************************


Rosette Christmas Tree Decoration


This table decoration turned out to be labour of love as I threaded all the beads myself. For every one that went on the thread about 3 bounced onto the floor!!
The concept is quite basic in that the centre upright is a covered straw and a number of rosettes are added.. Each rosette has circle of covered card to support it and are pushed onto the straw. Heat glue gun recommended for strength. Embellishments added - I chose beads to loop round and a pearl to finish. The top decoration is 2 "Bling Dazzles " glued back to back with beads round the " join".
I used Kraft style wrapping paper. About 135gsm. Card would, I think be too thick for creasing.
The tree could be made even simpler by stacking the rosettes on top of each other or a smaller gap left between each layer. I am sure you  will think of different styles.